The Half Windsor Knot – considered one of the most popular tie knots in use.
It's Symmetrical, balanced, and appropriate for most professional occasions.
Today, we’re going to learn how to tie the Half Windsor knot and make it part of your style.

The Half Windsor knot is medium-sized, symmetrical in shape and works well with a medium spread collar. We've created an infographic and video tutorial for you. Make sure you subscribe to our YouTube channel and check out our article on 18 ways to tie a tie.
#1. Half Windsor Knot – History
The Half Windsor knot was possibly created as an attempt to simplify the steps of the Windsor knot. The Half-Windsor gathered prominence in the gray business suits of the 1950’s. It was likely due to the fact that the crisp, clean focal point that the knot created gave it an air of power in the office.
#2. Half Windsor Knot – Description
If you’re just beginning to learn to tie a tie, the Half Windsor knot should be one of your first knots. It's slightly more complicated than the Four In Hand Knot but still easy to master. Remember, practice makes perfect!
In The 85 Ways to Tie a Tie by Thomas Fink and Yong Mao, the Half-Windsor is known as numbers seven (Li Ro Ci Lo Ri Co T) and eight (Li Ro Ci Ro Li Co T). The Half-Windsor creates a moderately sized symmetrical triangular knot. It' slarger than the four in hand yet smaller than the full Windsor.
Despite the misnomer, the Half Windsor is not half the size of the full Windsor.
Rather it is about 75% of the size. This makes it a better proportional choice for taller men, as it uses less of the necktie than the Windsor.
Because of the smaller size of the knot, the Half Windsor not only works well with medium spread collars, but also point collars and button down collars.
#3. Half Windsor Knot – Step By Step
Without further adieu, let's dive into tying the Half Windsor.
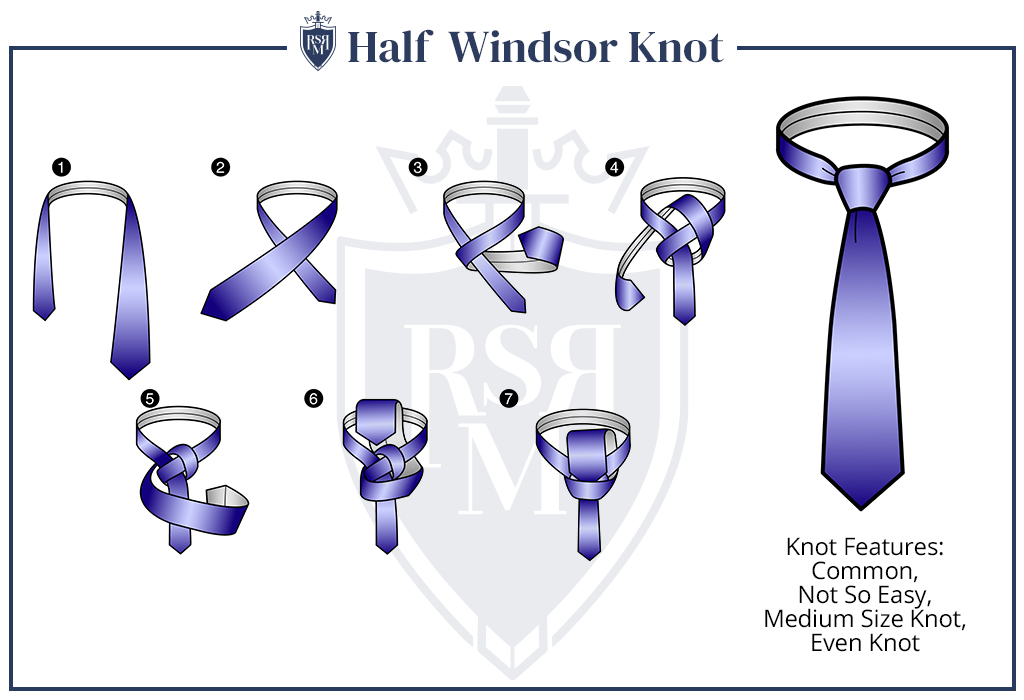
- Drape the tie over your neck and adjust it until the wide end is longer than the narrow end
- Cross the wide end of the tie over the narrow end
- Bring the wide end around and behind the narrow end
- Take the wide end over and through the opening near your neck
- Wrap the wide end across the front of the thin end
- Pull the wide end under and through the neck opening
- Pull the wide end of the knot through the loop formed in the front
- Finally, tighten the knot by pulling on the wide end while holding the knot until you’re satisfied with the look
You can bring the knot up to your neck by holding the narrow end of the tie while pushing the knot up with your other hand. Finally, keep your tie looking tight by putting the narrow end through the keeper loop on the back of the tie.
Your tie should rest between the top and middle of your belt line. If it’s too short, start over making the narrow end higher. If it’s too long, start with narrow end lower.
The Half Windsor knot is a classic tie knot that will work for any formal occasion. It should be your next step after the Four In Hand Knot before learning the Full Windsor Knot.
Now that you've learned the Half Windsor, it's time to broaden your skill set. There are 17 other knots out there. Try your hand at one of these classic tie knots.
Click Here To Watch The Video On YouTube – How To Easily Tie A Half Windsor Knot
The post How To Tie Half Windsor Knot Step By Step Tutorial appeared first on Real Men Real Style.


0 Commentaires